Sidebar
Table of Contents
Autoresponder
An autoresponder is a way of automatically replying to messages as they arrive in a user's mailbox.
In VPOP3, an incoming message must arrive in a user's mailbox for the autoresponder to trigger. If you use forwards, assistants, mappings, etc to divert a message before it arrives in the mailbox, the autoresponder will never trigger. If you want to use an autoresponder, but not keep the original message, then make sure the message arrives in the mailbox (eg by using an 'Assistant' rather than a 'Forward', with the 'Redirect to assistant' option off), but turn off the 'Keep original message' option in the autoresponder settings. This will make the autoresponder delete the original message after responding to it.
Configuring Autoresponders
For Versions 3 and 4 see Autoresponders v3 & v4
In VPOP3 version 5, the autoresponder system has changed from previous versions. It is now a lot more flexible, but this does mean that it is slightly more complicated.
In version 5, you can create multiple autoresponders for a single user, and create multiple conditions for each autoresponder to say when it should act.
For instance, you could create three different autoresponders, one for evenings, one for weekends, and one for your holidays, and have different text (and other actions) with each of them, then for your holiday autoresponder you could configure all your holidays for the year ahead, so it will automatically turn on and off at the appropriate times.
Creating or editing an autoresponder
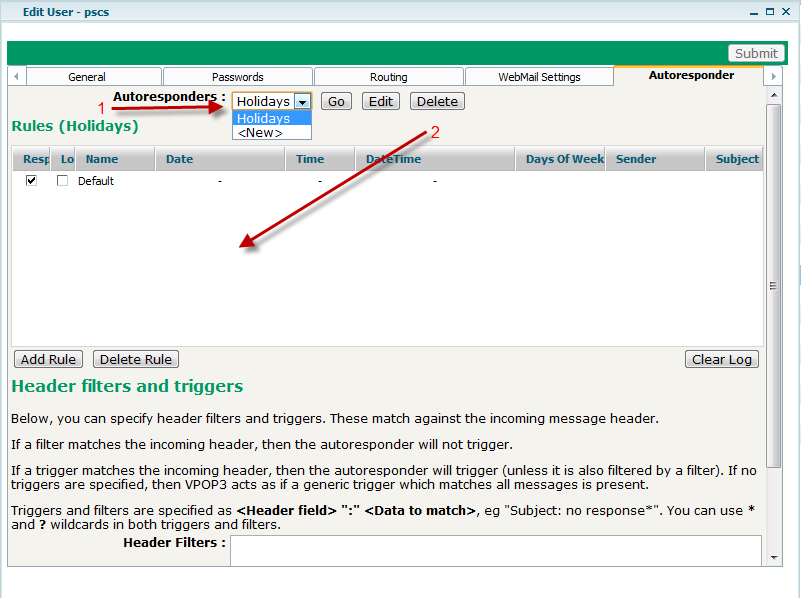
To create an autoresponder, edit the user, and go to the Autoresponder tab

In the Autoresponders: drop-down at the top (1), choose the existing autoresponder name (if any) or <New> to create a new autoresponder. Usually it will select this autoresponder automatically, but if it doesn't, pressing Go will select the autoresponder, and show the rules which will trigger the autoresponder in the table beneath (2).
Note that this drop-down only selects which autoresponder you are currently editing. It does not select which autoresponder is used; all the defined autoresponders are used, depending on the rules defined for the autoresponders.
Autoresponder definition
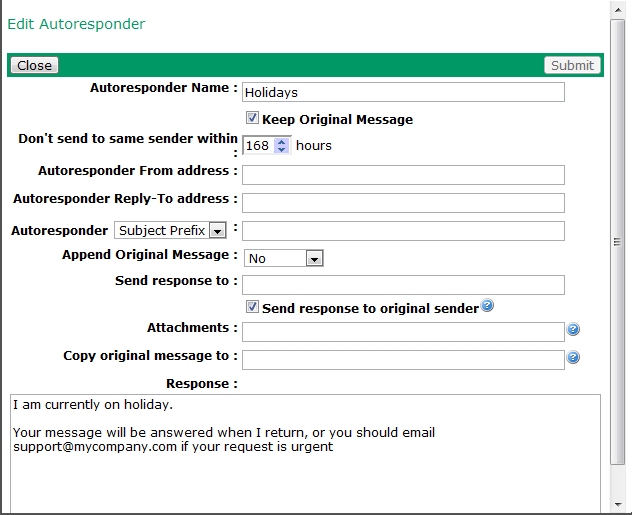
Pressing Edit will take you to the page where you can edit the autoresponder definition. This contains the text of the autoresponder, attachments, headers, whether the original message should be copied to another user, and so on.

- Autoresponder Name - this is a name which you give the autoresponder for your future reference. This name is not published in the autoresponder at all
- Keep Original Message - this indicates whether the original incoming message should be kept in the user's mailbox. Most of the time this option should be set, otherwise the incoming message(s) will be lost.
- Autoresponder From address - this indicates the From email address which will be used when sending the automatic response. If you don't set this, VPOP3 will use the user's <username>@<local domain> address
- Autoresponder Reply-To address - this indicates the Reply-To email address used when sending the automatic response. If the original sender replies to the automatic response, their reply will go here. If you don't set anything, it will use no-one@<your domain> to prevent replies being processed again (to try to prevent “autoresponder loops”)
- Autoresponder Subject Prefix/Subject - this indicates modifications to the original message subject. If you choose Subject Prefix then the specified text will be prepended to the start of the original subject when replying. If you choose Subject then the whole subject will be replaced with the specified text
- Append Original Message - you can choose No, Headers or Full to indicate whether the original message should be added onto the automatic reply. (Most times this will be set to 'No')
- Send response to - you can specify one or more email addresses to send the reply to here (separate them with commas). If you leave this blank the automatic reply will go to the original sender
- Send response to original sender - if this is checked, the reply will go to the original sender (as well as any other addresses specified, if any). If it is not checked, and you have specified one or more addresses in the 'Send response to' box, then the reply will only go to the specified addresses and not to the original sender
- Attachments - specify an attachment filename (on the VPOP3 PC) here
- Copy original message to - you can specify one or more email addresses to send the original message to here
- Response - type in the automatic response here. This will usually be plain text, but you can specify an HTML message by writing the HTML source code here (for advanced users) - VPOP3 detects the leading <HTML> tag and handles it as HTML
Once you have defined the autoresponder, you can create the 'rules'
Autoresponder Rules
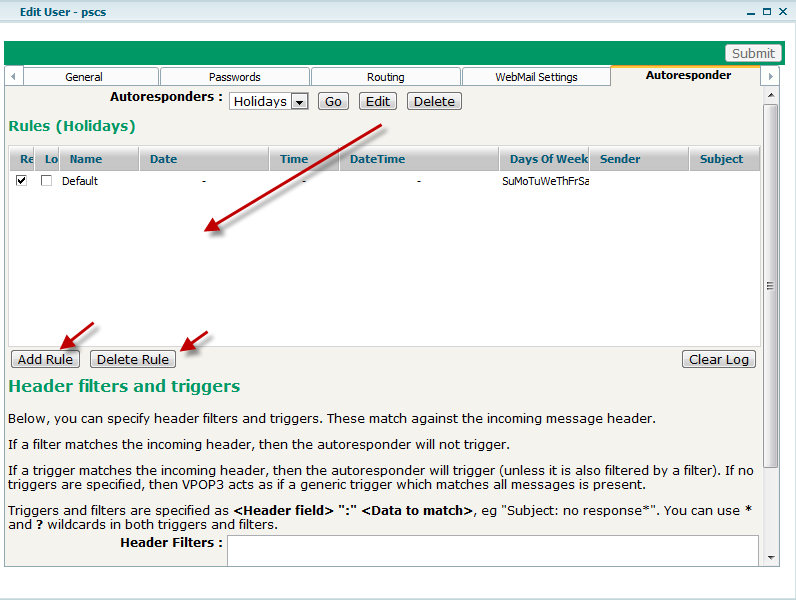
Each autoresponder you have defined can have zero or more rules
Each autoresponder rule tells the autoresponder when to trigger. If any of the rules match the conditions, then the autoresponder will trigger.
By default, when you create a new autoresponder, it will have a single rule which will always trigger.

You can see the list of rules, add new rules or delete existing rules. If there are no rules for the autoresponder, it will never trigger.
To edit an existing rule, just double-click on it in the list.

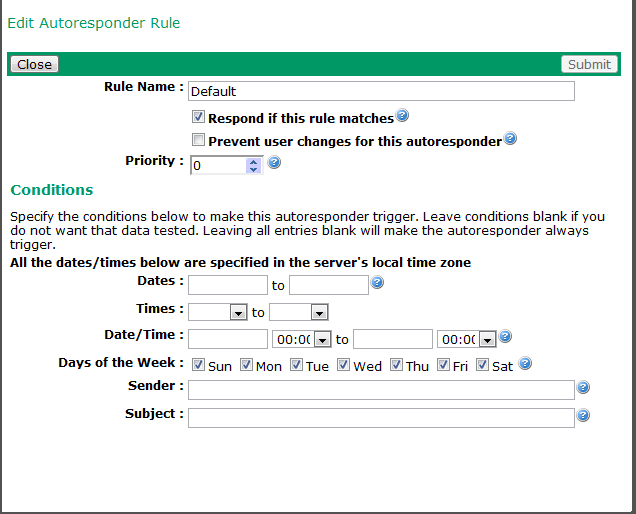
- Rule name is a name you give the rule for your own reference, eg “Summer holiday”
- Respond if this rule matches tells VPOP3 whether to send the response when this rule matches. Usually this will be checked, but by not checking it it lets you specify exceptions to the other rules. Note that this does not disable this rule, the rule still applies, but if it matches, then no autoresponse will be sent.
- Prevent user changes - this stops the user from changing the rule via their Webmail access
- Priority - this lets you put the rules in a suitable order (higher priorities are processed first)
Conditions
- Dates - specify dates between which the autoresponder will trigger.
- Times - specify times between which the autoresponder will trigger.
- Date/Time - specify dates & times between which the autoresponder will trigger.
- Days of the Week - specify which days of the week the autoresponder will trigger on.
- Sender - specify text to match for the original message sender to make the autoresponder trigger. You can use * & ? wildcards or surround regular expressions with / / characters.
- Subject - specify text to match for the original message subject to make the autoresponder trigger. You can use * & ? wildcards or surround regular expressions with / / characters.
If you leave any (or all) of the conditions blank (except for 'Days of the Week'), then that condition will not be checked (so you can leave all the conditions blank, to have the autoresponder always trigger)
The Dates, Times and Date/Time settings are sometimes a bit confusing because people may think that Dates + Times is equivalent to Date/Time, but they are different.
If you have Dates of 1 March 2012 - 7 March 2012 and Times of 10:00 - 14:00, then the autoresponder will trigger between 10am and 2pm on each day between 1st and 7th March (inclusive)
However, if you have Date/Times of 1 March 2012 10:00 - 7 March 2012 14:00, then the autoresponder will trigger from 10am on 1st March to 2pm on 7th March.
You can use Dates, Times and Date/Times in the same rule.
