Sidebar
This is an old revision of the document!
Table of Contents
Mail tab
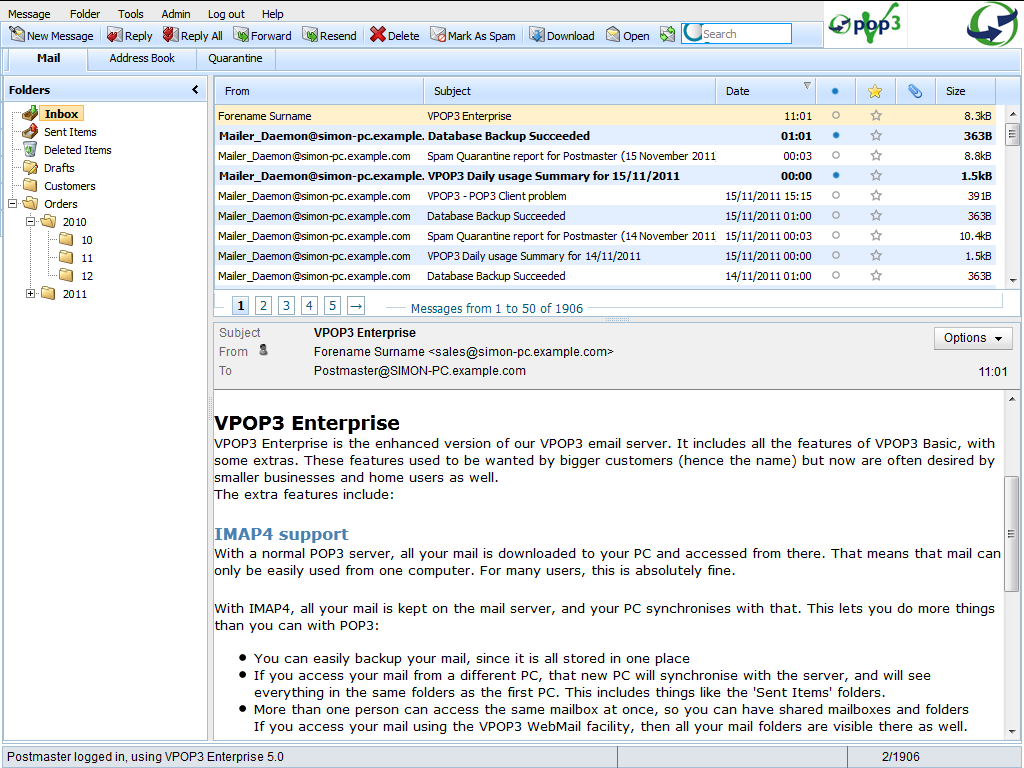
The Mail tab within VPOP3 version 4 webmail enables you to manage your sent and received messages.
As you can see from the screenshot, the page is divided into three main sections:
Page structure
Mail toolbar
The Mail toolbar contains the following buttons:
- New Message → Launch a tab to compose a new message
- Reply → Launch a tab to compose a reply to the selected message
- Reply All → Launch a tab to compose a reply to all recipients and the sender of the selected message
- Forward → Launch a tab to forward the selected message
- Resend → Launch a tab to resend a verbatim copy of the selected message
- Edit Draft → Launch a tab to resume editing the selected draft message. Displayed in place of Resend
- Delete → Delete the selected message(s) - Send to Deleted Items / permanently delete from Deleted Items folder
- Mark As Spam → Quarantine the selected message
- Download → Version 5+ - Downloads a .eml format copy of the email to the user's web browser
- Open → Version 5+ - Launch a tab to view the message in 'fullscreen'
- Refresh → Refresh the Mail tab - check for any changes, i.e. any new messages, any messages/folders that have been affected by another user or email client.
- Search → Perform a keyword search to filter the displayed messages
Mail folders
The left panel forms a tree structure to display the various mail folders. Subfolders are stored within branches. Any branch of the tree can be opened/closed by pressing the +/- icons next to the parent folder.
Selected folder messages
The top-right panel is a grid containing fields: From, Subject, Date, read, flagged, with attachments, Size. By default, 50 messages are displayed at a time, with page navigation options made available once enough messages are present.
Selected message display
The bottom-right panel displays the currently selected message. It contains a header bar, which provides the most commonly required header information: Subject, From, To, Date. An Options button enables you to:
- Show Headers → Launch a dialogue box with the full message headers
- Print Message → Output a printer-friendly display of the message and launch the printer options dialogue
Underneath, the message appears, with vertical and horizontal scrollbars, if required. Further boxes may appear if:
- The message has attachments
- Images have been blocked
Performing actions
Moving messages
There are three ways to move a message to a different folder:
- Drag and drop
- Select the message(s) you wish to move
- Left-click and hold the mouse button down, over a selected message
- Drag the mouse to the left, over the desired new folder. The mouse cursor should be accompanied by a tick icon.
- Let go of the mouse button
- Right-click context menu
- Select the message(s) you wish to move
- Right-click on a selected message
- Left-click on “Move to folder”
- Select the target folder
- Left-click on “Move to folder”
- Message menu
- Select the message(s) you wish to move
- Left-click on the “Message” option in the Menu bar
- Left-click on “Move to folder”
- Select the target folder
- Left-click on “Move to folder”
Copying messages
To copy messages, you may either use the Right-click context menu or Message menu options above, but you must select “Copy to folder” in place of “Move to folder”.
Marking messages read/unread
There are three ways to change the read status of a message:
- Right-click context menu
- Select the message(s) you wish to mark
- Right-click on a selected message
- Left-click on “Mark Read”
- Right-click and choose “Mark Read” again to alternate the read status
- Message menu
- Select the message(s) you wish to move
- Left-click on the “Message” option in the Menu bar
- Left-click on “Mark Read” or “Mark Unread” as appropriate
- Read 'circle' icon
- The fourth grid column contains a blue circle that is filled blue for unread messages and see-through for read messages
- Click on the circle icon for a message to toggle its read status
Flagging messages
There are two ways to flag/unflag a message:
- Right-click context menu
- As per marking a message as read, but use “Mark Flagged” in place of “Mark Read”
- Flagged 'star' icon
- The fifth grid column contains a star that is filled yellow for flagged messages and see-through for unflagged messages
- Click on the star icon for a message to toggle its flagged status

